
Slidify
A little bit more sysadmin oriented tutorial
Goyo Ambrosio
Jul. 18 2018
R presentations
R presentations are presentations coded as Rmarkdown and then translated to HTML using the R programming language framework.
Rmarkdown is a markdown based R syntax that helps make documents in many different formats.
There are many different ways to make r presentations in RStudio (oslides, Slidy, Beamer, ...)
Slidify exists as a package with a huge online community and popularity.
Slidify has the most options and flexibility but you mustn't to use it until you are more comfortable with R packages and general syntax.
What is Slidify
Slidify is a tool that makes it easy to create, customize and publish, reproducible HTML5 slide decks using R Markdown.
Slidify helps create, customize and share, elegant, dynamic and interactive HTML5 documents using R Markdown.
It is is an almagamation of other technologies including knitr, Markdown, and several javascript libaries
It allows embedded code chunks and mathematical formulas
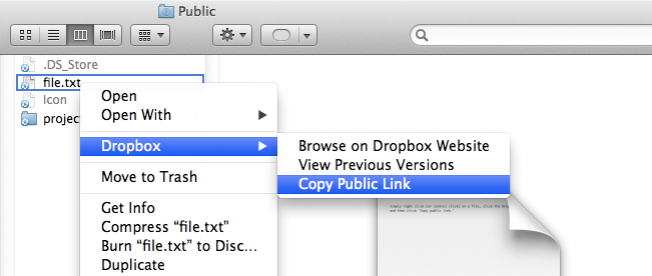
You can view slidify presentations with any web browser and share them easily on Github, Dropbox, or your own website
Set up your workspace
Things you need
To work with slidify you need the right environment:
- A language and environment for statistical computing and graphics: R
- An integrated development environment (IDE) for R: RStudio
- Optionally a powerful more-than-an-editor like Emacs customized with Spacemacs, ESS and Polymode.
- A way to install R packages under development (i.e. slidify): devtools
Preferably in Linux!
How to install R
The Ubuntu archives on CRAN are signed with the key of “Michael Rutter". To add the key to your system run:
sudo apt-key adv --keyserver keyserver.ubuntu.com --recv-keys E084DAB9
edit the source.list file
sudo vim /etc/apt/sources.list
and add the corresponding source to your operating system version [Ubuntu 16.04|17.10|18.04]
deb https://cloud.r-project.org/bin/linux/ubuntu [xenial|artful|bionic]-cran35/
Finally, to install the complete R system, run:
sudo apt update
sudo apt install r-base
How to install RStudio
Download RStudio.
Install it (rstudio-xenial-1.1.453-amd64.deb in this case) from command prompt
# For Debian based
sudo dpkg -i rstudio-xenial-1.1.453-amd64.deb
# install dependencies
sudo apt install -f
Or click deb file through the file manager. Ubuntu will install it and its dependencies.
How to install Emacs and Spacemacs
As usual, run this command
sudo apt install emacs
Download SourceCode Pro font, uncompress and install. (it takes some seconds ... don't suspect, it's working)
sudo mv ~/Downloads/source-code-pro-2.030R-ro-1.050R-it/OTF /usr/share/fonts/opentype
sudo fc-cache -f
To install Spacemacs type
git clone https://github.com/syl20bnr/spacemacs ~/.emacs.d
The first time you run Spacemacs you must to answer three initial configuratation questions.
How to install ESS and polymode major modes for Emacs
Edit .spacemacs, usually under your home directory.
Activate
essconfiguration layerdotspacemacs-configuration-layers '(ess)Add
polymodepackage as additional packagedotspacemacs-additional-packages '(polymode)Add extension associations
dotspacemacs/user-config ()
(add-to-list 'auto-mode-alist '("\\.Rmd$" . poly-markdown+r-mode))
How to install devtools
Previously you need to install some libraries in your system:
$ sudo apt-get install build-essential libcurl4-gnutls-dev libxml2-dev libssl-dev
Now run R as sudo and install the package
$ sudo -i R
> install.packages('devtools')
How to install slidify
Now you are ready to install Slidify
Slidify is not on CRAN and needs to be installed from github using the devtools
package.
pkgs <- c("slidify", "slidifyLibraries", "rCharts")
devtools::install_github(pkgs, "ramnathv")
If you are brave, http://slidify.github.io recommends installation of the
package dev version but I don't recommend it.
devtools::install_github(pkgs, 'ramnathv', ref = 'dev')
Now you are ready to create your first slidify presentation.
Create a new Deck
Each presentation is called a 'deck'. To create a new deck open R, set
your working directory and use the author command.
setwd("/path/to/")
require(slidify)
author("myDeck")
/path/to/myDeck is created.
Create a R Project from Existing Directory
File -> New Project -> Existing Directory -> /path/to/myDeck -> Create Project
A file called myDeck.Rproj will be created under /path/to/myDeck.
Add version control with Git
If git is installed, then the author command also initializes a git repository,
switchs to a gh-pages branch and commit all changes.
Before uploading your deck to your favourite Git cloud provider create
.gitignore to avoid version control for non essential files.
cd /path/to/myDeck
touch .gitignore
vim .gitignore
Add your ignored extensions
# RStudio files #
.Rproj.user
.Rhistory
.RData
.Ruserdata
# ...
Upload the new repository to BitBucket or GitHub
Create an empty Repository, e.g. myDeck in BitBucket or GitHub. With an empty
repository a default branch called master won't be created. Then push the
local myDeck repository to the remote myDeck repo. Note that a new branch
called gh-pages has been created.
cd /path/to/myDeck
git add .
git commit -am "Initial commit"
git remote add origin_github https://github.com/username/myDeck.git
git remote add origin_bitbucket https://username@bitbucket.org/username/myDeck.git
git push -u origin_[github|bitbucket] --all
git push -u origin_[github|bitbucket] --tags
Now you can work with your new repository as usual
Cloning your repo
To clone the repo on your machine take in account that you'll need to clone gh-pages branch
git clone -b gh-pages https://github.com/username/myDeck.git
or
git clone -b gh-page https://username@bitbucket.org/username/myDeck.git
Editing with Emacs and RStudio
index.Rmd is the only file you need to edit and for that you have two ways:
- Using RStudio opening the project file, e.g.
/path/to/myDeck/myDeck.Rproj - Using Emacs with ESS/Polymode major mode.
To take advantage of their editing capabilities RStudio and Emacs can be used simultaneously.
You can enable Emacs keybindings within RStudio using the Code section of the Global Options dialog.
Changes made to the edited files will be updated in real time both in Emacs and RStudio.
Slidify it !
slidify("index.Rmd")
browseURL("index.html")
and don't forget to update your git repository
git status
git commit -am "Updating my repository"
git push
Edit slides
index.Rmd = YAML + R Markdown
index.Rmd is the R Markdown document which you will use to compose the content of your presentation.
It's composed of a YAML section and a body section.
YAML metadata
includes the title, subtitle, author, and job of the author. Also
includes what slide framework you wish to use, which code highlighter you
wish to use, and any widgets you want to include.
In addition it can include other fields like a logo to appear in your title
slide under logo, the path to your assets folder and the paths to any other
folders you may be using under url, and the specific theme for your code
highlighter of choice under hitheme.
Under YAML you can include your slides just using R Markdown to write them.
R Markdown is a file format for making dynamic documents with R. An R Markdown document is written in markdown and contains chunks of embedded R (and other languages** code.
How YAML looks
---
title       : Slidify
subtitle    : A little bit more sysadmin oriented Tutorial
author      : Gregorio Ambrosio
job         : Apr. 17 2018
framework   : io2012        # {io2012, html5slides, shower, dzslides, ...}
highlighter : highlight.js  # {highlight.js, prettify, highlight}
hitheme     : zenburn       # {zenburn, tomorrow, solarized-dark, ...}
widgets     : bootstrap     # {mathjax, quiz, bootstrap}
mode        : selfcontained # {standalone, draft}
knit        : slidify::knit2slides
logo        : goyologo.png  # Graphic files will be in ~/myDeck/assets/img
biglogo     : goyologo.png
license     : by-nc-sa
github:
  user: goyoambrosio
  repo: SlidifyTutorial
  branch: "gh-pages"
assets      : {assets: ../../assets}       # Add an assets directory
libraries   : {libraries: ../../libraries} # Add a libraries directory
ext_widgets : {rCharts: [libraries/nvd3, libraries/leaflet, libraries/dygraphs]}
---
Slides
Your first slide begins under YAML and looks like this:
--- .myClass #myId &myLayout
or
---{class: myClass, id: myId, tpl: myLayout}

## Slide Title

- Whatever you put after `##` will be the title of the slide.
- Each slide needs to be preceeded by an empty line followed by `---`
  this denotes the beginning of a new slide and the end of the previous slide.
- `.class #id` are `CSS` attributes you can use to customize the slide.
- Whatever you put between `##` and `---` is up to you! As long as it is
  valid R Markdown or `HTML`.
Blocks
Blocks are slides nested within a slide, identified by three stars. Just like a slide, they can contain properties, title and content.
There are two types of blocks - named and unnamed. A block can be named by
specifying the property {name: block1} (or using the symbolic shortcut
{=block1}).
A block with the name block1 can be accessed in a slide layout as
slide.block1. The title and content of this block can be accessed as
slide.block1.title and slide.block1.content**. Unnamed blocks are aggregated
into the namespaceslide.blocks**.

Slide Customization
Slide customization
- Properties. They are implemented as css. You can find them in
libraries/frameworks/io2012/cssor write your own css files underassets/css. Your css files will be loaded when open you slidify presentation. - Layouts. They are implemented as html files conforming mustache
specifications under
libraries/frameworks/io2012/layouts. Also you can write your own layouts and locate them underassets/layouts. - Widgets. A widget is a collection of stylesheets, javascripts and layouts that add additional functionality to a slide deck.
With io2012 framework you have two layouts: twocol.html and vcenter.html
besides the default slides.html. Be careful with the examples because they
often use their own layouts.
This presentation also uses its own files as assets/css/app.css and
assets/layouts/carousel.html.
Properties
Slide properties
Slide properties, i.e. attributes, are key-value pairs that are passed to the
layout.They are valid YAML and are written after --- as follows
.class_name_1 .class_name_2 #id_value
class:[class_name_1, class_name_2] id:id_value
{class: [class_name_1, class_name_2], id: id_value}
The three lines are equivalent. The first one follows symbolic css style prefixes where a dot indicates class, a hash refers to id and an ampersand identifies a layout.
e.g.
.segue #myId bg:blue
class:segue id:myId bg:blue
{class: segue, id: myId, bg: blue}
For clarity we will use the third option
Slide properties table
| VARIABLE | DESCRIPTION |
|---|---|
| slide.title | The title of the slide with no markup |
| slide.header | The title of the slide with markup |
| slide.level | The title header level (h1 - h6) |
| slide.content | The contents of the slide sans header |
| slide.html | The contents of the slide with header |
| slide.num | The number of the slide |
| slide.id | The id assigned to the slide |
| slide.class | The class assigned to the slide |
| slide.bg | The background assigned to the slide |
| slide.myblock | The slide block named myblock |
| slide.blocks | The slide blocks which are not named |
| slide.rendered | he rendered slide |
Slide to parse
--- {class: class_name, id: id_value, bg: color_name}

## Slide Title

Slide Contents
Parsed slide
$html
[1] "<h2>Slide Title</h2>\n\n<p>Slide Contents</p>\n"

$header
[1] "<h2>Slide Title</h2>"

$level
[1] "2"

$title
[1] "Slide Title"

$content
[1] "<p>Slide Contents</p>\n"

$class
[1] "class_name"

$bg
[1] "color_name"

$id
[1] "id_value"
Layouts
About layouts
Slidify uses whisker to render the final html by passing the parsed data to the layout file.
Whisker is a mustache implementation in R confirming to the mustache specification.
A layout is a mustache template that specifies the markup to render a slide.
To identify a layout you can use an ampersand (&) or tpl as key. e.g.
---&layout_name or ---tpl:layout_name
Slidify combines the parsed slide plus the layout to render the HTML.
Creating a layout
To create a new layout you must to make a new .html file conforming the mustache
specification under your assets/layouts directory.
Insert your code and reference it as a slide property, i.e.
cd /path/to/myDeck/assets/layouts
touch myLayout.html
vim myLayout.html
and then use it in your slide as follows
---&myLayout
or
---{tpl: myLayout}
Carousel layout
---
layout: test
---
{{{ slide.content }}}
<div id="{{slide.id}}-carousel" class="carousel slide {{slide.class}}">
<!-- Indicators -->
<ol class="carousel-indicators">
{{# slide.blocks }}
<li data-target="#{{slide.id}}-carousel" data-slide-to="{{num}}" class="{{class}}"></li>
{{/ slide.blocks }}
</ol>
<!-- Wrapper for slides -->
<div class="carousel-inner">
{{# slide.blocks }}
<div class="item {{class}}">
<img src="{{img}}" alt="{{alt}}">
<div class="carousel-caption">{{{ content }}}</div>
</div>
{{/ slide.blocks }}
</div>
<!-- Controls -->
<a class="left carousel-control" href="#{{slide.id}}-carousel" data-slide="prev">‹</a>
<a class="right carousel-control" href="#{{slide.id}}-carousel" data-slide="next">›</a>
</div>
Carousel


Vcenter layout
vcenter layout presents content in the slide center.
Use vcenter layout as follows
---&vcenter
or
---{tpl: vcenter}
Slide contents
Two columns Layout
Two columns layout presents content distributed in two columns.
Use layout as follows
---&twocol w1:40% w2:60%

## Using twocol layout

This slide has two columns

*** =left

- point 1
- point 2
- point 3

*** =right

- point 1
- point 2
- point 3
Using twocol layout
This slide has two columns
- point 1
- point 2
- point 3
- point 1
- point 2
- point 3
Playing with code
Code hightlighting
We want that our code blocks look good. Syntax highlighting let us to make code clear and understable.
Usage:
```<language>
... code
```
Using Hightlight.js
Highlight.js is a syntax highlighter written in JavaScript. It works with pretty much any markup, doesn’t depend on any framework and has automatic language detection.
Main features
- 176 languages and 79 styles
- automatic language detection
- multi-language code highlighting
- available for node.js
- works with any markup
- compatible with any js framework
Knitr
The knitr package was designed based on the idea of “Literate Programming” (Knuth 1984), which allows you to intermingle program code with text in a source document.
When knitr compiles a document, the program code (in code chunks) will be extracted and executed, and the program output will be displayed together with the original text in the output document.
For instance, for an R Markdown (Rmd) document, we write code chunks between
```{r} and ``` and inline R code
is written in `r <expr>`. Chunk options are written
before the closing brace in the chunk header.
knitr support a lot of computer languages that are implemented in knitr language engines.
Note that knitr converts {<language_name> ...} to <language_name> but the
language name in knitr corresponds to the engine that executes the code but
does not have to correspond to the name used by hightlight.js.
Recipes
Section
---{class: [segue, dark]}

## Section name
---{class: segue, bg: green}

## Section name
Table
## This is a table

| **Variable**    | **Description**                       |
|-----------------|---------------------------------------|
| `slide.title`   | The title of the slide with no markup |
| `slide.header`  | The title of the slide with markup    |
| `slide.level`   | The title header level (h1 - h6)      |
| `slide.content` | The contents of the slide sans header |
| `slide.html`    | The contents of the slide with header |
| `slide.num`     | The number of the slide               |
| `slide.id`      | The id assigned to the slide          |
| `slide.class`   | The class assigned to the slide       |
| `slide.bg`      | The background assigned to the slide  |
| `slide.myblock` | The slide block named myblock         |
| `slide.blocks`  | The slide blocks which are not named  |
| `slide.rendered`| The rendered slide                    |
Changing page number color
---{class: green}

## Slide Title

Slide Content
Corner banner: example class
<a class='example' href="http://your.url">click here</a>

## Slide Title

Slide content
Corner banner: definition class
<a class='definition' href="http://your.url">click here</a>

## Slide Title

Slide content
Image inclusion
To include an image in your slide you must insert html code as follows:
<img style='margin-top: 5px' class="center" src='assets/img/slide_properties.svg' width=500px></img>
Also sometimes you will find the following code
<iframe src='assets/img/slidify_banner.png'></iframe>
Quoted text
Use <q>...</q> html tags
<q> Slidify helps __create__, customize and share, elegant, dynamic and ...</q>
Slidify helps create, customize and share, elegant, dynamic and interactive HTML5 documents using R Markdown.
Inserting text file content
Sometimes you'll need to include raw code or text in your slide.
You can to create a text raw file and insert it as follows
 ---{class: RAW}

 ## Slide

 ``` {r results = 'asis', echo = F}
 writeLines(paste('\t', readLines('assets/includes/myfile.txt')))
 ```
Slide with custom background
Two options:
---{bg:url(assets/img/<my_image_file>)}
or
---{id:custbg}

## Slide with custom background

<style>
#custbg {
  background-image:url(assets/img/<my_image_file>);
  background-repeat: no-repeat;
  background-position: center center;
  background-size: cover;
}
</style>
Presenter display and presenter notes
You can define speaker notes within any slide by adding the line *** =pnotes
before it. Here is an example of a slide with speaker notes.
You can view speaker notes by pressing the key p which acts as a toggle and
automatically opens the presenter view.
For io2012, you need to add ?presentme=true to the presentation url, which
will then open the presenter view.
You can also include an image in the presenter display using markdown syntax,
e.g.
*** =pnotes
Presenter notes

Comment out a slide
Change
---
Slide 1 content
---
Slide 2 content
---
by
---
<!--
Slide 1 content
-->
Slide 2 content
---
Using iframe
CSS related
Changing background in all slides at once
Include this in your /assets/css/mycss.css:
slides > slide {
  background: #hex !important;
}
Changing the font type on slides
@import url(http://fonts.googleapis.com/css?family=Baumans);

.title-slide hgroup > h1{
font-family: 'Baumans', cursive;
}

.title-slide hgroup > h2{
  font-family: 'Oswald', 'Calibri', sans-serif;
}

/* Fonts and Spacing */
article p, article li, article li.build, section p, section li{
  font-family: 'Open Sans','Helvetica', 'Crimson Text', 'Garamond',  'Palatino', sans-serif;
  text-align: justify;
  font-size:22px;
  line-height: 1.5em;
  color: #AA7139;
}

...
Other stuff
Tutorials and resources
Thank You
For more information you can contact.
wwwhttps://goyoambrosio.com
e-mailmailto:contact@goyoambrosio.com